Labels

bargains (2) birthdays (1) communication (1) crafts (1) decorating (4) food (8) good idea (7) living (18) marriage (1) parenting (17) serving (1) thriftiness (23) time (4) wedding (1)
Showing posts with label decorating. Show all posts

Tuesday, July 12, 2011

Blind men shouldn't rearrange furniture

I love to rearrange! Furniture is my favorite. Cam will often wake up and walk into a completly different layout - if he ever loses his eyesight, he may be in trouble!

This works because most of my rooms have complementary colors so they will work in any room - and because my house is "Primitive Country" which basically means whatever I can pick out of the trash, clean up and reuse -  works for me!

With summer here, we've been eating out back on our porch most nights. As we sat there we all were saying how nice it would be to have a ceiling fan out there. Well, two trips to Lowes and 3 hours later our dream became a reality!

Now the back porch is like another room, and a room needs to be decorated. I started by putting a table cloth on the nasty picnic table. Next I potted a flat of basil and marigolds I had bought from the school next store to ours (their students planted and grew them from seed and then stood outside and sold them! - love it!)

I brought out 2 tables from inside and set to "accessorizing" them. Like I said, I pulled from the house to make it work! I also decided it would be nice to have utensils and napkins outside so I put them inside a big jar I use for punch at parites, but sits in my closet all the other days of the year.


I finished with a few accessories, such as a ladder, rubber boots, an outdoor clock and an old rusty star.

Outdoor room complete and best of all - it cost me nothing but the cost of the fan (and installation - still waiting for Cam's bill to come!)

Making a usable outdoor space make Cents and Sensibility!

Saturday, March 5, 2011

Jorie's Sweatshirt

So as promised I will walk you through a felting project with a wool sweater - when you are done, you will have a beautiful felted bag.


Take a wool sweater and felt it - wash in hot water, dry on hot heat with tennis ball and repeat if necessary. Then lay out your sweater - I already cut off the arms to use as leg warmers for a Halloween costume. Make cuts as shown.

Then turn the sweater inside out and line up the side seams - so the bottom side seams match. Sew along the bottom - this is the only skill involved, so if you really can't sew, ask a friend or I guess you could duct tape it shut! Now turn the sweater back to the right side - you are done!! You have a super simple bag!

You could embellish with cut out felt pieces that you sew on or do a blanket stitch around the straps or you can just enjoy it NOW - so easy!!

There are a couple of projects you can make with the sleeves. You could make a sleeve to hold your plastic grocery bags, a cover for your water bottle so it doesn't "sweat" or a reusable sleeve for your coffee mug.


Now for the surprise craft project!

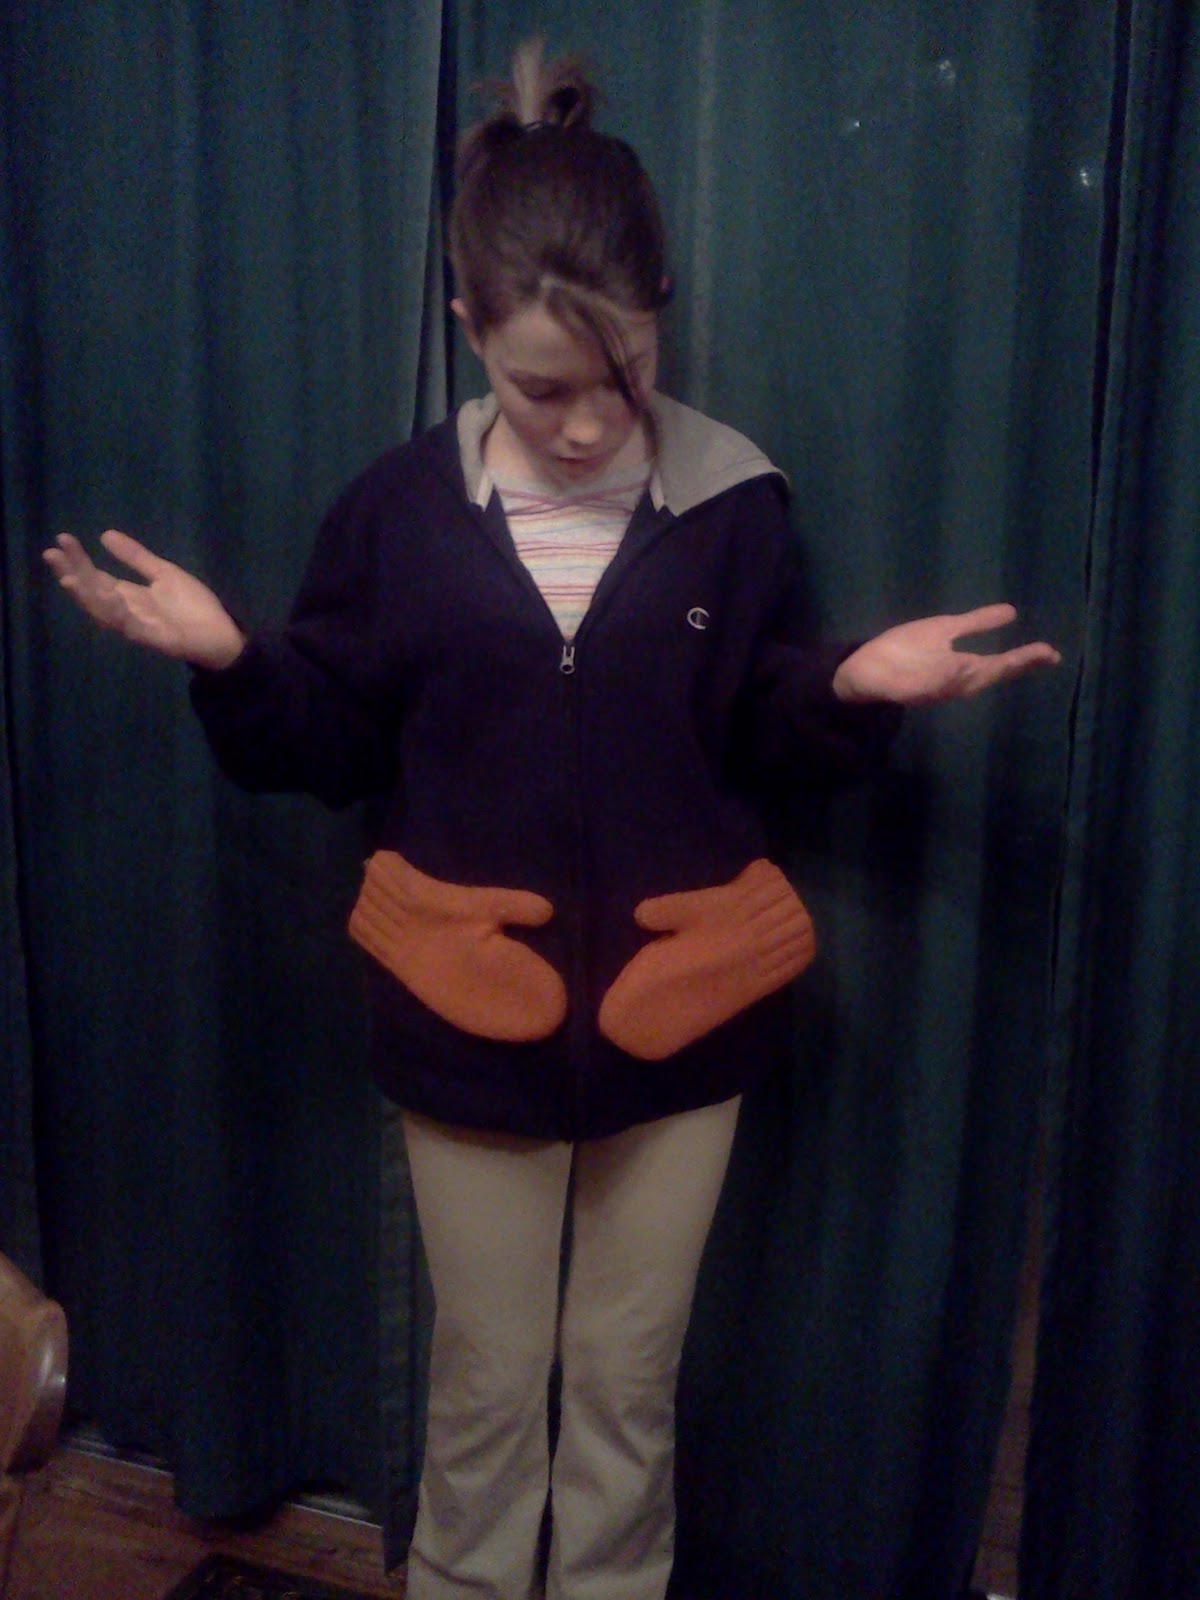
Over Christmas Colin showed me a sweatshirt online that had built in mittens - it was really cute, but not $70 cute. So, he asked me to make one for his girlfriend Jorie. Sure, no problem!

First I practiced on a sweatshirt that I already had - I had to remove the front pockets, which was a little tricky. I took my seam ripper and carefully took out the stitches. Then I went looking for a  pair of mittens - apparently you can't buy mittens in Pennsylvania in January - but if I needed a pair of sandals, I'd be in luck. So I took one of my felted sweaters - the one I showed you yesterday that looked like a basketball and I cut out a mitten from the sleeve - the bottom was the cuff. I stitched up the sides - it worked perfect!! Then I hand sewed it onto the sweatshirt.

The $70 sweatshirt now was free!!

I gave that one to my niece "Abischmale" which is what her Uncle Cam calls her (no, we can't get him to stop):

mittens...

or no mittens!!!


Isn't that cute!! Now to make another one for Jorie. I bought a navy blue sweatshirt at Target, ripped out the front pockets.  My friend Anne had hunter green mittens she didn't want. I sewed those onto the front. Colin gave it to her this past week when she was down visiting - she loved it! And it was so easy!

The best part about making something for someone is the time I spend working on it. I can't help but think about that person and to pray for them - I feel like it is a double gift I get to give them.

Crafting for those we love, makes cents!!

Friday, March 4, 2011

I Never Knew You "Felt" That Way

A funny thing happens when you put a wool sweater in the washer and dryer - you have doll clothes! Yes, wool shrinks! Which normally would be a bad thing, but if you are interested in working with a material that is strong, versatile and has beautiful colors - wool is for you!
When wool shrinks it is called felting which is essentially where those felt squares come from. I have knitted with wool and then felted it but you have to oversize what you are making to allow for shrinkage. The easiest thing to do is to buy wool items - sweaters, scarves, skirts and then shrink them. This is super easy because wool is itchy and doesn't always sell well at the thrift shop. Also, sweaters that may not have desirable color combinations make great craft canvases. You just have to make sure the label says 100% wool. So when they have those $1 a bag sales stock up!

Easy directions: Place the wool items in the washer ( wool only-  don't try to wash other clothes while felting - it will just makes a mess) Wash with hot water, put in the dryer with a tennis ball on high heat. Check to see if it is shrunk enough - meaning the yarn is tightly woven and dense. If not, repeat. If you want to stretch or reshape an item that is already shrunk, throw it back in the washer and shape while wet - air dry. Don't cut your sweater until you have felted it - it will just unravel, but once it is felted, you have a smooth, straight edge.

Now let the fun begin - below are some things that I have made out of felt:

Photo album - remove cover from album, attach felt with glue or stitching.


Coasters - I doubled the felt and did a blanket stitch around the edge.

This was a sweater that I shrunk and then cut in a square. I stitched around the edges and then unbuttoned it to insert a pillow.

This was a turtleneck that I shrunk and then cut off the arms and the waist - no sewing required because the felting stops it from unraveling.

This is a bag that I knitted out of wool yarn - it was super big and took a long time, but so easy - just knit round and round. I felted it and then washed it again to shape it while wet - then air dry. This is the strongest bag I have ever owned - I stuff it like crazy and it hasn't failed me yet. I have also made lunch bags and baby bags - sorry no pictures, they were all gifts!

This is another sweater that I made into a pillow - I think it looks like a basketball!

So that is how you felt - it's that easy! A little girl at school had barrets with little ladybugs on them cut out of felt and another had a head band - a piece of felt with cut out flowers and a piece of elastic. You can be creative with felt and there is very little sewing involved.

Tomorrow I will show you step by step how to make a bag out of a felted sweater - very little sewing required and a surprise craft idea I know you will love!!

Crafting in my world always makes cents!!

Wednesday, February 23, 2011

That Used To Be What??

Tonight I was determined to do Megan, Colin and Ryan's taxes - federal, state and local (thank goodness Dylan is working under the table). I'm usually on top of these kinds of tasks but since I've become totally obsessed with blogging, these things seem unimportant - I'm sure the government would understand.

So as I buckled down, my wonderful husband sat down to figure out how to add pictures to my blog. I've been wanting to do this for a while - so here is my  repurposing idea:


This is a dresser that my neighbor was throwing out about 10 years ago. I took it and spray painted over the white enamal a lovely tan color and the kids kept their puzzles, toys and videos inside.

Then we moved and it became the school supply holder. It held paper, binders, pencils, crayons and all the thousands of supplies that are on the teachers back to school list, but never seem to be asked for once the kids are in school.

TIP: Buy extra supplies when the back to school sales are on. I buy 10 cents folders, $1 for 3x5 cards, etc. That way we have extra supplies on hand and dry goods never expire (I sound like Laura Ingalls when I say dry goods).When they get their supply list for the next year I have the kids shop first in the dresser before we go to Staples.

Back to the dresser - alas, the top drawer broke and was totally useless. That's when I came up with the idea to use it as a TV stand - but you and I know, no TV stands alone, you need your "Boxes", the VCR, the DVD, FIOS and in our case the XBox. So I took out the top drawer, laid the bottom panel of the broken drawer on the runners, tacked it down and  "TA DA" - an "antique" entertainment center. I put all the boxes on the top shelf where the cords can be easily accessed through the back and I store DVDs in the 2 bottom drawers.

I also treated it to a new coat of paint, which this picture doesn't do justice - it is a really nice mustard yellow - complete with brown smudges and strategic areas sanded off - I told you before I like my furniture looking old and beat up. (I'll tell you another time how I do that, since it is one of my favorite things to do!!)

That's the fun of being creative - not being stuck on what something is supposed to do, like hold clothes, but all the possibilities of what it could do.And who knows in a few years, I might decide to turn it into something else, like a changing table for my grandbabies!! That makes cents!