For years I have kept a pad of paper on my fridge, but it always bugged me that I had to walk the 2 feet to my hutch to grab a pen to write on it. So this year, I took an old pencil box from school, cut off the top and stuck a flat magnet on the back. Yipee - no more extra steps to grab a pen!
It kind of bothered me that I had two different sets of kitchen chairs - the same design but a different stain - so after seeing my sister-in-laws beautiful dining room table complete with black chairs, I bought 4 cans of black spray paint - semi-gloss from Walmart - 98 cents a can and spray painted the chairs. I then took a steel wool pad and sanded them - showing wear in the seat, and around the curved top - finish with a coat of spray polyurethane - "new" "matching" kitchen chairs for under $5!
Just read an article that said that grocery stores rotate sale items about every 3 months. Now I know how much to stock up on items. Before I would guess how much spaghetti I should buy at the bottom price and hope it went on sale again before I needed it. Now I have a good gauge on how much to buy.
Speaking of buying - I got 2 phone calls and many shouts "Mom, come here" last week - there was a new show on TLC" called Extreme Couponing. I was a bit excited to watch, even though I don't use a lot of coupons. By the end of the show I was completely turned off. It should have been called Extreme Hoarding - I am sure there are completely respectable people that do an awesome job with their coupons, but I felt like this showcased stockpiling for the sake of the deal. I never brag about how much I "saved" it is more about what I didn't spend in the first place. If I don't need 30 bottles of antacids, why would I be excited to get 30 bottles for a penny. I am not discouraging coupon use, but be wise, don't mistake "saving" with wasting your time and money on items you don't need in the first place. We live in a world that tells us more is better, well, more is just more.
So there you have it - 3 good ideas and 1 idea I will be skipping - not bad for making cents and sensibility!! Let me know what good ideas you've come up with lately!
I am a believer,wife, mom, teacher, and problem solver.Yes, that last title is self proclaimed but it has been confirmed. I love to see a problem and figure out how to solve it - as quickly and frugally as possible. So with the encouragment of my husband and the eye rolls of my children - I blog!
Labels
bargains
(2)
birthdays
(1)
communication
(1)
crafts
(1)
decorating
(4)
food
(8)
good idea
(7)
living
(18)
marriage
(1)
parenting
(17)
serving
(1)
thriftiness
(23)
time
(4)
wedding
(1)
Showing posts with label good idea. Show all posts
Saturday, April 16, 2011
Thursday, March 10, 2011
My Bags Are Packed I'm Ready To Go!
As we were skyping the other night she was mentioning that she had bought vanilla and before I could get the words out of my mouth, she said "I know, I put them in a Ziploc!"
The following packing tips are not for the affluent traveler who can take as many bags as they want, wear multiple outfits, buy whatever they have forgotten to pack or has the luxury of unpacking into a walk in closet. This is for the parents who decide to take 3 children under age 5 on a 8 week trip to Europe and discover they are pregnant with their 4th the first week they are there! True! As we packed, we knew we were the only two people capable of carrying anything and on top of that we needed to bring a portacrib, stroller and 8 weeks worth of diapers. It was at that time I got serious about packing!
1. Less is more - lay out what you want to bring and then put half back in the closet. Unless you have the room to bring it, don't. Only bring things that can be used more than once (excluding underwear). We decided on 2 back packs and a large suitcase for all 5 of us - so space was limited.
2. Bag everything! I learned this trick on my first missions trip - we were given duffel bags to pack our stuff in. When we arrived we lived out of these bags for 10 days. Ever try to find a pair of socks at 5:30am with no lights? Now, I put everything in mesh bags (I found them at the dollar store) All the socks and undies go in one bag, t-shirts in another, shorts, etc. It makes finding your clothes so much easier. At first I put whole outfits in a bag, but I like a little more spontaneity in my life! If you are able to unpack and put your clothes in a dresser where you are going, this hint in unnecessary!
3. Ziploc bags - every liquid goes in - there is nothing worse than NyQuil all over your clothes! I also put together a baggie of band aids, ointment, etc. to travel with - in case of injuries. Each of us has our own toiletry bag - this was a present for when they went on their first missions trips. They keep it stocked with the items they need.
4. Leave a copy of your itinerary and passport at home with a friend - also copies of your credit cards - Ryan had his passport stolen in Africa and this came in very handy!
5. Have a going home outfit! Save one outfit, complete with undergarments to travel home in - it will make that trip all the more pleasant - for everyone! We also pack an outfit and toothbrush in our carry on in case we get laid over somewhere - this has happened more than once. And I must say taking 25 teenagers to the Walmart to buy "unmentionables" can be exciting!
6. That won't fit! - Just watch me! - I am notorious for closing bags - the trick is to sit on it and squeeze all the air out of it. Also, to shuffle the contents, I will lift up the bag and drop it, to let everything settle, it's amazing how it then zips. But make sure you weigh it - they don't mess around with weight at the airports and fines are pricey!
7. Let your kids pack! - I actually hate to pack, so this was easy - I would give them a list of what they needed and double check on them- now it is just the amount of days we will be gone and we go through the checklist verbally - toothbrush, pj, extra shoes. You can buy most items you might have forgotten and if you forget your underwear once, you'll never make that mistake again!
8. Air Bags - you know those bags that you suck all the air out of with a vacuum cleaner hose. We borrowed them when Colin was moving to CO for school. He was packing quilts, blankets, towels, snow gear - so I felt they were helpful, but for normal packing, I wouldn't invest in them - just lay on top and squeeze - works about the same and is much more fun!
This is kind of basic ideas, geared a little more towards missions trips, but wherever you go, it helps to pack efficiently - it will make your trip easier and if you don't have to buy forgotten items - it will give you extra cents to use on your trip!
Tuesday, March 8, 2011
Mass Production
Obviously I like to mass produce!
If you made kids as cute as these, you would too! But I also like to mass produce in my daily life. If I am going to put forth the effort to accomplish one task, why not get the most out of it.Take for example food prep. When I cut up my veggies, carrots, celery, etc. I do all the veggies, not just the ones we will be eating for that meal.
Let's say I prep each time I want a carrot - get out carrots, cutting board, knife, cut, eat, clean up cutting board, knife, counter, put rest of carrots back in the fridge. Repeat when hungry.
Or I can mass produce - take out carrots, cutting board, knife, cut up all the carrots, put away, clean up cutting board, knife, counter. When hungry - eat carrots.
Which is a better use of my time?
If I am heating the oven I will throw in anything that needs to be cooked so I don't waste the energy it takes to cook just one thing. If I cook chicken - I throw it all in the crock pot and then refrigerate the leftovers. When I am ready to use them in a meal, they are already cooked, all I have to do is reheat. If I can double a meal and freeze the other one, I do it. It takes the same amount of effort to prep and cook so doesn't it make sense to double or triple it. The clean up is basically the same - I've used the same utensils and pots.
I used to stencil slates for a living (actually I had a craft business). When I would do a pattern, I would do all the same slates at one time. I would go down the table in an assembly line fashion. It saved a ton on clean up and time by doing it this way.
When I see a gift that I like, I buy or make a number of them and put them away. Then if I need a last minute gift, I go to the "Gift Drawer" - not to Walmart.
When the kids were little and I made baby food for them, I never prepared just one meal - I would cook up all the sweet potatoes, carrots, chicken and beans and then grind them up and put them in ice cube trays. I would freeze them and then pop them out into a Ziploc. When it was time for a meal, I could pull out a variety of foods, defrost and serve.
When I do haircuts, I let the boys know this is it for the next 2 weeks - get it now! To pull out the kit and clean up is the same whether I cut 1 boys' hair or 4. And I would rather get it all done in one shot.
Now that gas is $25 a gallon - oh is that just in Newtown?? I try to make the most of my trips out - lumping all my errands together, not making unnecessary trips to the grocery store, etc. Not only will this save me gas, but also my time.
I've said it before - time is money - if you do things more efficiently and as cheaply as possible, you get it! So think about what you have to do each day - can you lump several activities together, can you double or triple your effort, it's all these small decisions that add up to make a lot of cents!
Saturday, March 5, 2011
Jorie's Sweatshirt
So as promised I will walk you through a felting project with a wool sweater - when you are done, you will have a beautiful felted bag.
You could embellish with cut out felt pieces that you sew on or do a blanket stitch around the straps or you can just enjoy it NOW - so easy!!
There are a couple of projects you can make with the sleeves. You could make a sleeve to hold your plastic grocery bags, a cover for your water bottle so it doesn't "sweat" or a reusable sleeve for your coffee mug.
Now for the surprise craft project!
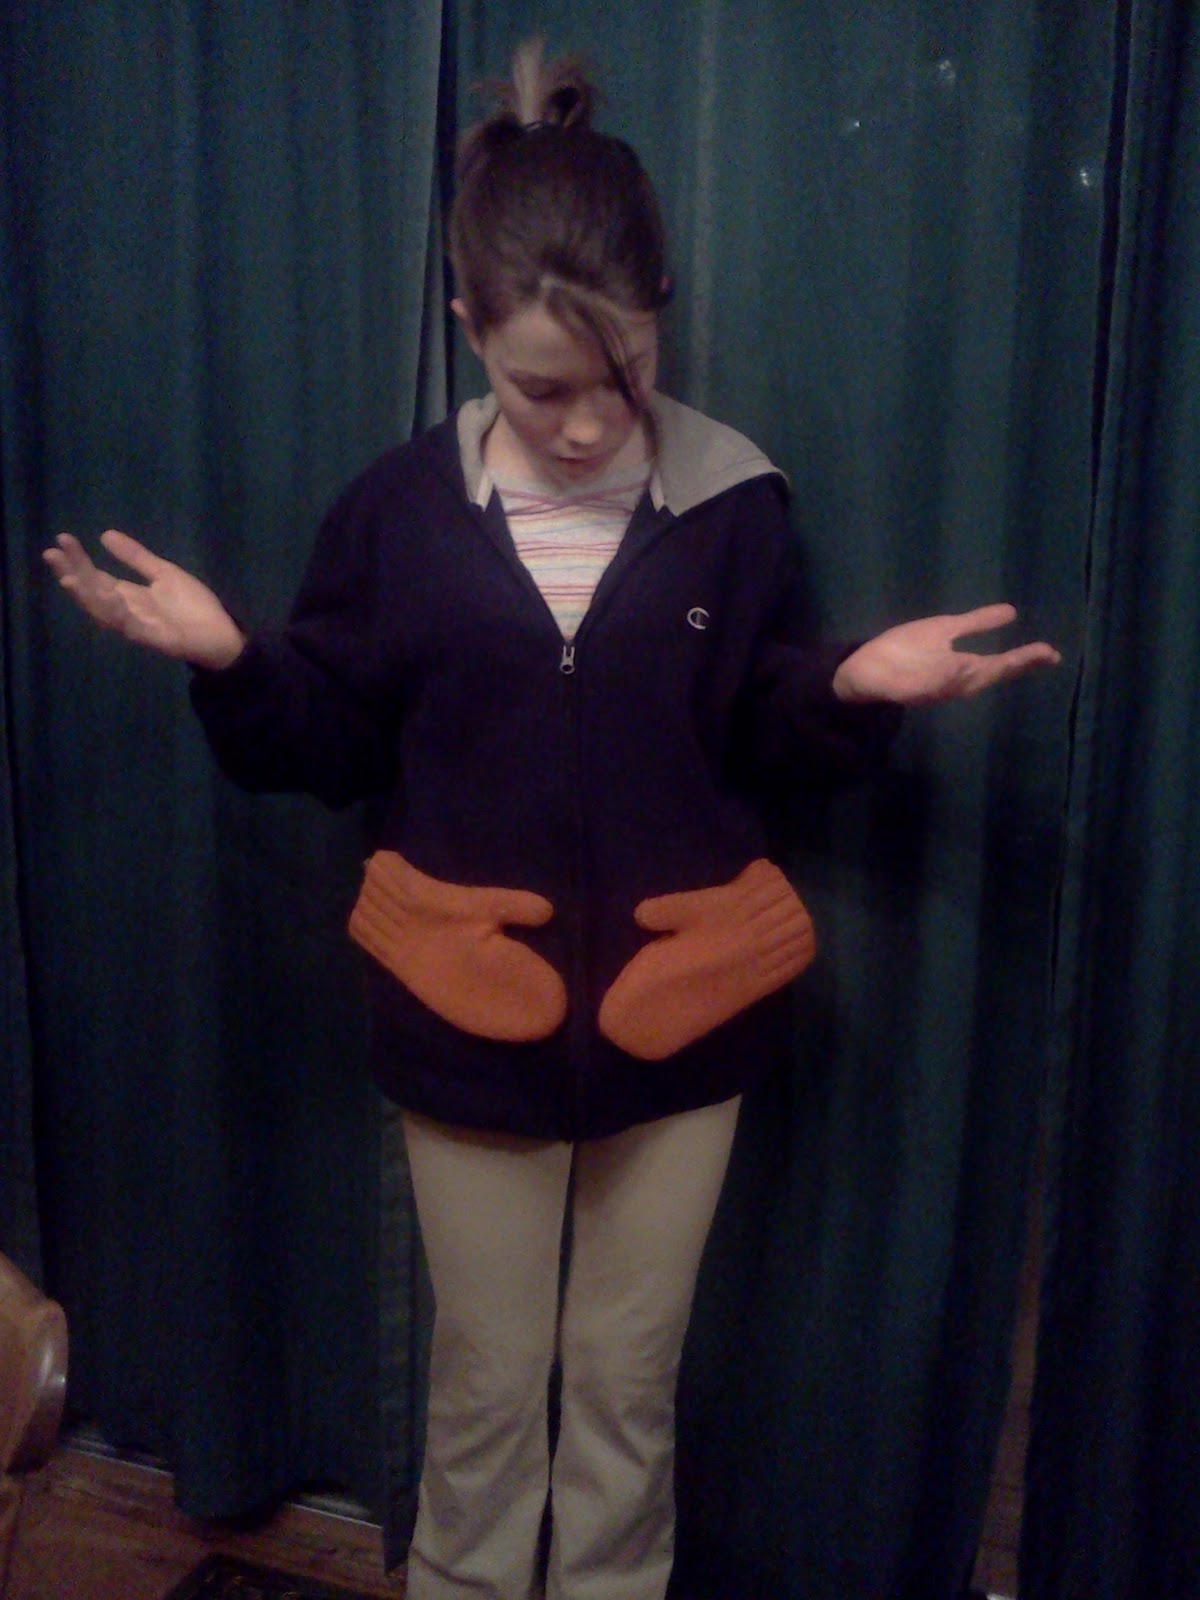
Over Christmas Colin showed me a sweatshirt online that had built in mittens - it was really cute, but not $70 cute. So, he asked me to make one for his girlfriend Jorie. Sure, no problem!
First I practiced on a sweatshirt that I already had - I had to remove the front pockets, which was a little tricky. I took my seam ripper and carefully took out the stitches. Then I went looking for a pair of mittens - apparently you can't buy mittens in Pennsylvania in January - but if I needed a pair of sandals, I'd be in luck. So I took one of my felted sweaters - the one I showed you yesterday that looked like a basketball and I cut out a mitten from the sleeve - the bottom was the cuff. I stitched up the sides - it worked perfect!! Then I hand sewed it onto the sweatshirt.
The $70 sweatshirt now was free!!
I gave that one to my niece "Abischmale" which is what her Uncle Cam calls her (no, we can't get him to stop):
Take a wool sweater and felt it - wash in hot water, dry on hot heat with tennis ball and repeat if necessary. Then lay out your sweater - I already cut off the arms to use as leg warmers for a Halloween costume. Make cuts as shown.
Then turn the sweater inside out and line up the side seams - so the bottom side seams match. Sew along the bottom - this is the only skill involved, so if you really can't sew, ask a friend or I guess you could duct tape it shut! Now turn the sweater back to the right side - you are done!! You have a super simple bag!
You could embellish with cut out felt pieces that you sew on or do a blanket stitch around the straps or you can just enjoy it NOW - so easy!!
There are a couple of projects you can make with the sleeves. You could make a sleeve to hold your plastic grocery bags, a cover for your water bottle so it doesn't "sweat" or a reusable sleeve for your coffee mug.
Now for the surprise craft project!
Over Christmas Colin showed me a sweatshirt online that had built in mittens - it was really cute, but not $70 cute. So, he asked me to make one for his girlfriend Jorie. Sure, no problem!
The $70 sweatshirt now was free!!
I gave that one to my niece "Abischmale" which is what her Uncle Cam calls her (no, we can't get him to stop):
mittens...
or no mittens!!!
Isn't that cute!! Now to make another one for Jorie. I bought a navy blue sweatshirt at Target, ripped out the front pockets. My friend Anne had hunter green mittens she didn't want. I sewed those onto the front. Colin gave it to her this past week when she was down visiting - she loved it! And it was so easy!
The best part about making something for someone is the time I spend working on it. I can't help but think about that person and to pray for them - I feel like it is a double gift I get to give them.
Crafting for those we love, makes cents!!
Friday, March 4, 2011
I Never Knew You "Felt" That Way
A funny thing happens when you put a wool sweater in the washer and dryer - you have doll clothes! Yes, wool shrinks! Which normally would be a bad thing, but if you are interested in working with a material that is strong, versatile and has beautiful colors - wool is for you!
When wool shrinks it is called felting which is essentially where those felt squares come from. I have knitted with wool and then felted it but you have to oversize what you are making to allow for shrinkage. The easiest thing to do is to buy wool items - sweaters, scarves, skirts and then shrink them. This is super easy because wool is itchy and doesn't always sell well at the thrift shop. Also, sweaters that may not have desirable color combinations make great craft canvases. You just have to make sure the label says 100% wool. So when they have those $1 a bag sales stock up!
Easy directions: Place the wool items in the washer ( wool only- don't try to wash other clothes while felting - it will just makes a mess) Wash with hot water, put in the dryer with a tennis ball on high heat. Check to see if it is shrunk enough - meaning the yarn is tightly woven and dense. If not, repeat. If you want to stretch or reshape an item that is already shrunk, throw it back in the washer and shape while wet - air dry. Don't cut your sweater until you have felted it - it will just unravel, but once it is felted, you have a smooth, straight edge.
Now let the fun begin - below are some things that I have made out of felt:
So that is how you felt - it's that easy! A little girl at school had barrets with little ladybugs on them cut out of felt and another had a head band - a piece of felt with cut out flowers and a piece of elastic. You can be creative with felt and there is very little sewing involved.
When wool shrinks it is called felting which is essentially where those felt squares come from. I have knitted with wool and then felted it but you have to oversize what you are making to allow for shrinkage. The easiest thing to do is to buy wool items - sweaters, scarves, skirts and then shrink them. This is super easy because wool is itchy and doesn't always sell well at the thrift shop. Also, sweaters that may not have desirable color combinations make great craft canvases. You just have to make sure the label says 100% wool. So when they have those $1 a bag sales stock up!
Easy directions: Place the wool items in the washer ( wool only- don't try to wash other clothes while felting - it will just makes a mess) Wash with hot water, put in the dryer with a tennis ball on high heat. Check to see if it is shrunk enough - meaning the yarn is tightly woven and dense. If not, repeat. If you want to stretch or reshape an item that is already shrunk, throw it back in the washer and shape while wet - air dry. Don't cut your sweater until you have felted it - it will just unravel, but once it is felted, you have a smooth, straight edge.
Now let the fun begin - below are some things that I have made out of felt:
Photo album - remove cover from album, attach felt with glue or stitching.
Coasters - I doubled the felt and did a blanket stitch around the edge.
This was a sweater that I shrunk and then cut in a square. I stitched around the edges and then unbuttoned it to insert a pillow.
This was a turtleneck that I shrunk and then cut off the arms and the waist - no sewing required because the felting stops it from unraveling.
This is a bag that I knitted out of wool yarn - it was super big and took a long time, but so easy - just knit round and round. I felted it and then washed it again to shape it while wet - then air dry. This is the strongest bag I have ever owned - I stuff it like crazy and it hasn't failed me yet. I have also made lunch bags and baby bags - sorry no pictures, they were all gifts!
This is another sweater that I made into a pillow - I think it looks like a basketball!
So that is how you felt - it's that easy! A little girl at school had barrets with little ladybugs on them cut out of felt and another had a head band - a piece of felt with cut out flowers and a piece of elastic. You can be creative with felt and there is very little sewing involved.
Tomorrow I will show you step by step how to make a bag out of a felted sweater - very little sewing required and a surprise craft idea I know you will love!!
Crafting in my world always makes cents!!
Wednesday, February 23, 2011
Don't Play With Matches!
I secretly LOVE fire - I love everything about it, the smell, the look, the warmth. When people leave a campfire and say "yuck, I smell like smoke" I think yum - how can I bottle that smell? Is there a Yankee Candle that smells like campfire??
Rabbit Trail Alert : Friends and I wanted to start a company called "Stankee Candle" where we would produced candles with smells like Wet Dog, Gym Locker and Backed Up Septic Tank. Anyway...
In the "old house" as my kids call the town house we lived in before we moved to our current and final house - no Ryan - you aren't kicking us out!! - we didn't have a fireplace - heck we had 1 bathroom, did I really think I would find a hidden fireplace. So when we bought this house I was thrilled that there was a big stone fireplace! And the funny thing about this fireplace is that the previous owners never used it!! It was sparkling clean. They had built this house and lived here 25 years - why did they never strike a match. Well it didn't take us long - we moved in Sept. and the first cold day we built a fire!
My husband grew up in farm country - behind his house was a vineyard and he loved to play out there. One day while he was playing he thought it would be fun to start small fires and put them out. Each time the fire got bigger and bigger until he could no longer stamp it out - so he ran in his house and hid. Soon enough the fire department was called by a neighbor and they arrived with their equipment and extinguished the flames -
yes, my kids come by " IT " honestly!
Now, you would think with this history that starting a fire would be a piece of cake - it isn't! If the wood isn't dry, you don't have kindling, etc. you don't get fire! My plan was to crumble up newspaper and light it, but all that gives you is a quick burst of flames and a lot of ash. So what to do - I started making fire starters - first I gathered pine cones and dipped them in candle wax - at the time I was making my own candles to sell. Then we discovered that just plain pine cones worked too. But pine cones can be sticky and messy - especially in the house. So now, I save my egg crates and take old jar candles that I have in my candle warmer that no longer smell good. I pour the wax into the egg crates (put newspaper underneath - it can be messy) and let harden.
Hurray - I made Fire Starters!
I break them apart and put a few in the fire between the logs and they REALLY work! And there is no waxy mess left behind - it all burns up.
The kids use them out in the fire pit Colin built out back - We had a clay fire pit that sat on a nice wrought iron stand that we could move around our yard. Then one weekend Cam and his brother decided to cut down a dead tree and burn the brush - next thing I know we have "Burning Ring of Fire" in our backyard. When it finally burned out - 3 days later - the fire pit had a nice crack in it. So Colin dug a hole, took the broken pieces, arranged them to create a in ground fire pit! He went on to build another one at his friends house with bricks. I can't tell you how much use this one area of our yard - get a fire pit, you have an instant party - just supply the marshmallows! And yes, our kids do take after their Dad - we looked out one night and they had piled on so much wood that the flames were shooting 20 feet in the air. But having your kids and their friends over for some low cost entertainment - really makes cents!
Rabbit Trail Alert : Friends and I wanted to start a company called "Stankee Candle" where we would produced candles with smells like Wet Dog, Gym Locker and Backed Up Septic Tank. Anyway...
In the "old house" as my kids call the town house we lived in before we moved to our current and final house - no Ryan - you aren't kicking us out!! - we didn't have a fireplace - heck we had 1 bathroom, did I really think I would find a hidden fireplace. So when we bought this house I was thrilled that there was a big stone fireplace! And the funny thing about this fireplace is that the previous owners never used it!! It was sparkling clean. They had built this house and lived here 25 years - why did they never strike a match. Well it didn't take us long - we moved in Sept. and the first cold day we built a fire!
My husband grew up in farm country - behind his house was a vineyard and he loved to play out there. One day while he was playing he thought it would be fun to start small fires and put them out. Each time the fire got bigger and bigger until he could no longer stamp it out - so he ran in his house and hid. Soon enough the fire department was called by a neighbor and they arrived with their equipment and extinguished the flames -
yes, my kids come by " IT " honestly!
Now, you would think with this history that starting a fire would be a piece of cake - it isn't! If the wood isn't dry, you don't have kindling, etc. you don't get fire! My plan was to crumble up newspaper and light it, but all that gives you is a quick burst of flames and a lot of ash. So what to do - I started making fire starters - first I gathered pine cones and dipped them in candle wax - at the time I was making my own candles to sell. Then we discovered that just plain pine cones worked too. But pine cones can be sticky and messy - especially in the house. So now, I save my egg crates and take old jar candles that I have in my candle warmer that no longer smell good. I pour the wax into the egg crates (put newspaper underneath - it can be messy) and let harden.
Hurray - I made Fire Starters!
I break them apart and put a few in the fire between the logs and they REALLY work! And there is no waxy mess left behind - it all burns up.
The kids use them out in the fire pit Colin built out back - We had a clay fire pit that sat on a nice wrought iron stand that we could move around our yard. Then one weekend Cam and his brother decided to cut down a dead tree and burn the brush - next thing I know we have "Burning Ring of Fire" in our backyard. When it finally burned out - 3 days later - the fire pit had a nice crack in it. So Colin dug a hole, took the broken pieces, arranged them to create a in ground fire pit! He went on to build another one at his friends house with bricks. I can't tell you how much use this one area of our yard - get a fire pit, you have an instant party - just supply the marshmallows! And yes, our kids do take after their Dad - we looked out one night and they had piled on so much wood that the flames were shooting 20 feet in the air. But having your kids and their friends over for some low cost entertainment - really makes cents!
Friday, January 28, 2011
"Opportunity" Solver
After graduating from college, getting married and moving to Dallas,TX I got a job teaching 3rd grade. Imagine my excitement after a 20 minute interview and writing sample I was offered a job. Little did I know the "opportunities" that lay ahead. I use that word opportunity because my principal refused to hear the word PROBLEM - there were no problems in his school, only opportunities. Well, being a young teacher in a rough inner-city school, I had PROBLEMS!
Now I tell that story because over the years I have become a self-proclaimed problem solver - what Mom isn't?! My husband and kids have come to rely on my ability to mull over a problem and come up with a solution - hence the title - Problem Solver.
I thought it would be fun to talk about one such example.
We have a cocker spaniel named Riley - or as she is known in our home Roo-Roo. Riley is a lively dog who has run away more times than I care to recall. At one point we had an electric fence, but she decided that freedom far outweighed shock therapy. So when Riley needs to relieve herself, she must be put on her chain. Which works out great in Spring, Summer and Fall but in Winter her leash clip lays on the cold, hard cement waiting to be clipped to her collar. Sometimes it is hard to open because of the cold or has been left in the snow because of laziness. So I got to thinking it would be nice to hang the end of the chain up off the ground. I tried bringing it inside, but the door wouldn't shut, I contemplated drilling a hook into the side of the house, but knew the zoning board a.k.a. my husband would reject that plan. Then I noticed my wrought iron shepherds hook in my garden. Being winter it was not being used, it was the right height - about 2 feet and the clip would fit perfectly on the end of the hook.
Problem Solved!
I share this story to show you most problems have a solution. It doesn't need to be expensive, elaborate or time consuming. Think outside the box, try new ideas and make sure when you do solve that problem you gather your friends and family to see your achievement - believe me, they may not seem impressed, but deep down they are.
It just makes cents!
Now I tell that story because over the years I have become a self-proclaimed problem solver - what Mom isn't?! My husband and kids have come to rely on my ability to mull over a problem and come up with a solution - hence the title - Problem Solver.
I thought it would be fun to talk about one such example.
We have a cocker spaniel named Riley - or as she is known in our home Roo-Roo. Riley is a lively dog who has run away more times than I care to recall. At one point we had an electric fence, but she decided that freedom far outweighed shock therapy. So when Riley needs to relieve herself, she must be put on her chain. Which works out great in Spring, Summer and Fall but in Winter her leash clip lays on the cold, hard cement waiting to be clipped to her collar. Sometimes it is hard to open because of the cold or has been left in the snow because of laziness. So I got to thinking it would be nice to hang the end of the chain up off the ground. I tried bringing it inside, but the door wouldn't shut, I contemplated drilling a hook into the side of the house, but knew the zoning board a.k.a. my husband would reject that plan. Then I noticed my wrought iron shepherds hook in my garden. Being winter it was not being used, it was the right height - about 2 feet and the clip would fit perfectly on the end of the hook.
Problem Solved!
I share this story to show you most problems have a solution. It doesn't need to be expensive, elaborate or time consuming. Think outside the box, try new ideas and make sure when you do solve that problem you gather your friends and family to see your achievement - believe me, they may not seem impressed, but deep down they are.
It just makes cents!
Subscribe to:
Posts (Atom)